Web Server
There are two methods to deploying ConfirmConnect® onto a Web Server. These are "de-coupled" (preferred method) and "Integrated".
- de-coupled - allows the installation of ConfirmConnect® to be kept independent of Confirm versions, in other words there is no need to upgrade Confirm host systems to use this version. Note: Some functionality will require upgrades to the main Confirm system, these are mentioned in each versions release notes.
- Integrated - installs ConfirmConnect® with the Confirm Connector. All versions must be kept in sync.
Pre-requisites for ConfirmConnect®
Below is a list of pre-requiste steps required for ConfirmConnect®, these are required for both Integrated and de-coupled installations
- IIS Web Server role is installed with the ASP.NET Role Service installed.
- A supported version of the Confirm Connector Installed. This can be installed on a different server.
- Confirm Access Code with ConfirmConnect® device licenses enabled. Please request an access code from your Confirm Project Manager.
- ConfirmConnect® requires .NET framework version 4 to work. Please download and install this before upgrading.Note: From ConfirmConnect® v20.20, Microsoft .NET framework 4.8 is required.
- Roles and Features: HTTP Activation feature is required for both .NET Framework 3.5 and 4.5. These can be added via the Server's Add Roles and Features Wizard.
- Create an application pool (named as you wish) configured to use .NET 4 with the Managed pipeline mode: set to Integrated.Note: For 64bit machines only: Once the application pool has been created, ensure you have the "Enable 32-Bit Applications" option set to True via the advanced settings.
- Install Visual C++ 2013 & Visual C++ 2015 Redistributables by navigating to https://www.microsoft.com/en-us/download/details.aspx?id=40784 and to https://www.microsoft.com/en-us/download/details.aspx?id=48145 and downloading the 'vcredist_x86.exe'. If you are running ConfirmConnect® on a 64bit machine you must also download and install 'vcredist_x64.exe'.
- Install MapXtreme 9.1, this can be obtained with the Confirm product download from Digital River. Please contact Confirm technical support team for details.
Web Server Installation and Configuration
This section details the manual steps required to setup your ConfirmConnect® Web Service so that it can be accessed by your devices and tested using Chrome. The following steps assume the use of IIS 7, Default Web Site and default options are used unless otherwise specified.
- Download and run the ConfirmConnectWebService.exe.
- Choose the location where to install the ConfirmConnect® Web Service.
- Enabling Confirm UEIP will allow both Web Service and all devices to send anonymous usage information to Confirm to help us improve our products and services.
- Within IIS, navigate to Default Web Site and use 'Add Application...'
- Enter an Alias name of 'ConfirmConnect' and set the Application Pool to the one created in the pre-requisite steps. Set the 'Physical path:' to the location you installed ConfirmConnect® to.Note: It is advised to use a separate application pool from the one being used by the Confirm Connector.
- ConfirmConnect® needs to know where the Confirm Connector is running so that it can process data into the Confirm database. To enable this, launch the registry editor and navigate to the Confirm.AM.Connector folder and add a 'New > String Value' called 'ConnectorAspNetURL'.
- Set the value to the url for the ConnectorAspNet.aspx file (located in the Connectors published application location) e.g. http://localhost/Connector/ConnectorAspNet.aspx.
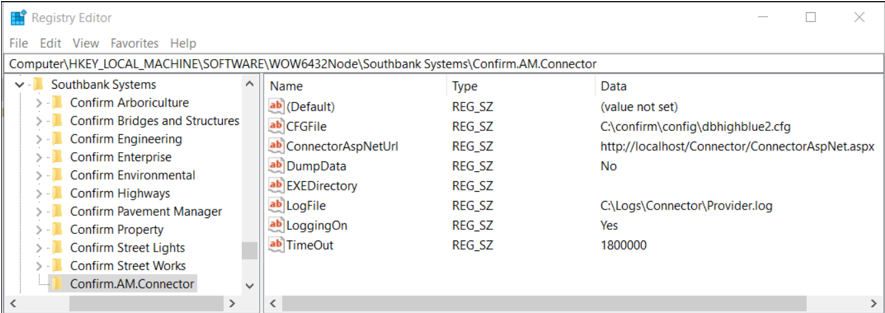
- Double check that the CFGFile and LogFile settings are correct and the latter should point to a directory that the Application Pool user has write access to.
Note: This 'LogFile' location is only used when connectivity to the database fails or when the Connector Settings screen in the Confirm client has NOT been specified.
The entry in the Connector Settings screen in Confirm will override this value when specified.
Upgrading
Download and Install the new version of the ConfirmConnectWebService.exe.
Testing
Perform the following steps to test the ConfirmConnect® web service.
- Using a web browser, browse to the TestConnection.html page and fill in the details to perform a test.
Log Files
In de-coupled mode the ConfirmConnect® web service will log any issues it can into a separate file located in the same location as specified for your Confirm Connector log file entry. The file will have the prefix of 'MS_' e.g. MS_Connector.log.